How to open a Wise account [2025 Guide]
Wise offers personal and business multi-currency accounts which you can use to hold 40+ currencies, spend in 150+ countries, and get paid like a local from 30+ countries. Plus, every time you need to convert from one currency to another, to send a payment or spend on your Wise Multi-Currency Card, you’ll get the mid-market exchange rate with low, transparent fees.
This guide to opening a Wise account in the US covers all you need to know about types of Wise accounts, account verification, required documents, getting set up with your account, and more.
Key points: Opening Wise Account in the US
- You can open your Wise account entirely online using the Wise app or desktop site — it’s quick, easy, and fee-free to set up.
- Hold money in your Wise account fee-free in up to 40+ currencies.
- Spend like a local in 150+ countries with the linked Wise card
- There’s no maximum limit on how much money you can hold in your account.
- Receive international payments in 20+ currencies with account details.
Can I open a Wise Account in the US?
Yes. If you’re a US resident aged 18 or over, you can open a Wise account online with just a few personal details and a valid ID.
How to open a Wise account
Wise multi currency accounts are opened and managed online or in the Wise app, with a fully digital account registration process.
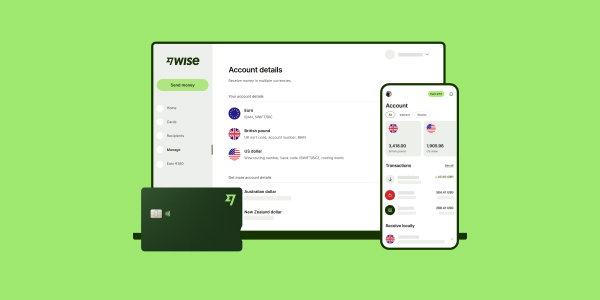
Once you’ve opened your Wise account you can send payments to 140+ countries, hold a balance in 40+ currencies, and access local account details in 8+ currencies to get paid easily.
If you’d like, you can also order a Wise Multi-Currency Card for convenient spending and withdrawals around the world.
Step by step Wise Account opening
Let’s walk through the steps you need to take to open your Wise multi-currency account. We’ll go through these steps one by one in detail in a moment but first, here’s an at-a-glance preview of what you need to do:
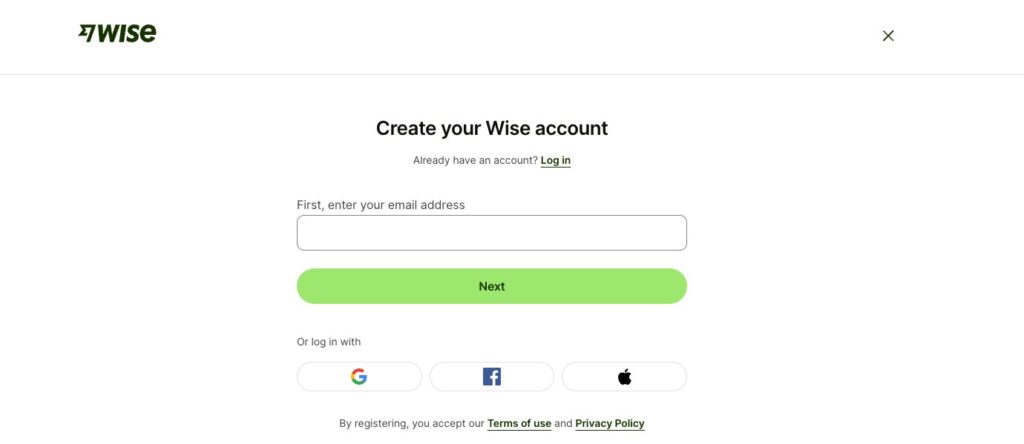
- Open the Wise desktop site or app and click on Create account
- Enter your email address
- Tap the type of account you want to open – personal or business
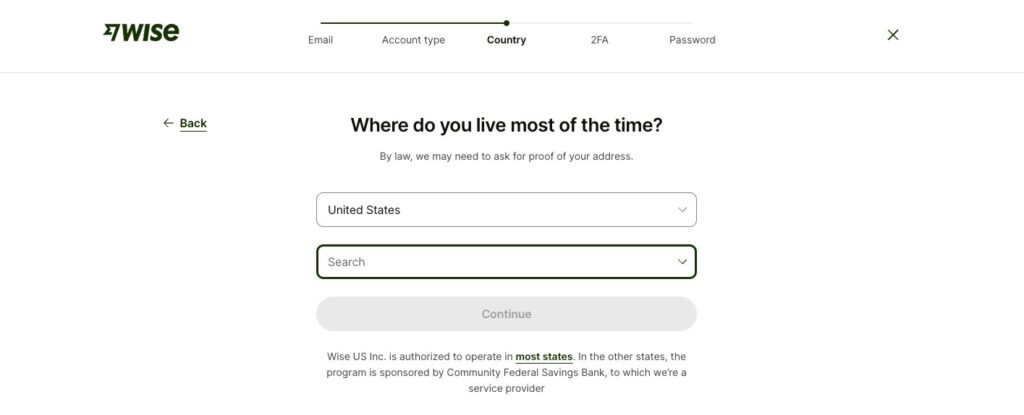
- Confirm your country of residence and your mobile number
- Upload some ID to get verified
- Order your Wise Multi-Currency Card (optional)
Wise Account opening requirements
You can open a Wise US account if you’re over 18, a legal US resident, and can provide some ID and proof of address paperwork to verify your account.
If you’re not a US resident you may still be able to open a Wise account in your country of residence – but do bear in mind that some Wise features and fees may be different if you’re opening your account in another country.
As part of the account opening process you’ll be asked to give some personal and contact information to allow Wise to provide you with services. You’ll also need to verify your address and ID which is a legal requirement to keep your account safe.

Wise account opening process: 5 steps
Let’s cover the steps into how to open a Wise account more in detail:
1. Open the Wise desktop site or app and click on Create account
The easiest way to open a Wise account is usually through the Wise app. Download the app on iOS or Android phones, and you can complete the account opening process and start to manage your money right away. You’ll also be able to make payments from your phone, check your balances, manage your Wise Multi-Currency Card if you choose to get one, and get instant transaction notifications.
2. Enter your email address
You’ll be prompted to register with either your email address or another identifier such as your Google, Facebook or Apple ID. All the steps you need to take are laid out on screen, so you can simply follow the prompts. If you ever have any questions you can also reach out to the Wise customer service team easily by opening a chat.
3. Tap the type of account you want to open – personal or business
Wise offers different account types in the US – personal and business. You’ll need to confirm which type of account you want, as the features and fees can vary between the 2 options.

4. Confirm your country of residence and your mobile number
You’ll be prompted to confirm where you live, and also enter a valid mobile number. The mobile number doesn’t have to be from your country of residence, but you’ll need to receive a one time password to activate your account – so do make sure your phone is working and you have signal.
5. Upload some ID to get verified
You’ll be asked to complete a verification step for security, usually by uploading images of some ID documents and confirming your personal and contact information. We’ll walk through what’s needed in more detail in a moment, but it’s good to know this step can be done easily with just your smartphone. You’ll be guided through the steps you need to take using onscreen prompts, and can simply take a photo of the required documents and upload that to the Wise app.
For a Wise US account you’ll also be asked to add your SSN if you have one. If you don’t have a US issued SSN, there are other options available, such as using your national ID card or driving license.
6. Optional: Order your Wise Multi-Currency Card
If you’d like to, you can now also add a balance and order a Wise Multi-Currency Card for a one time fee. You’ll simply need to tap the Cards tab in the Wise app, and follow the on screen instructions. Once your card order has been processed it’ll be sent to you by mail, and will arrive in 14 to 21 days. Wise US personal customers can also get a Wise Multi-Currency Card which can be used for online and mobile purchases, and which is available immediately upon ordering a physical card.
If you’re interested in opening a business account with Wise instead, this guide can help: How to open a Wise Business Account
What do I need to open a Wise account?
You can open a Wise US account entirely from your computer or smart device. To open a Wise multi currency account you’ll need to have the following information:
- Your personal and contact information
- Your SSN
- Valid proof of ID
- Valid proof of address
Wise can accept a range of documents to verify customers’ identity and address – all you’ll need to do is to take a quality image of the documents you’re using, and upload them within the Wise app. If you have any problems you can simply reach out to the Wise team using the chat feature to get advice.
Examples of required documents for opening Wise account
Here are some common examples of the documents used to prove your ID and address when getting verified with Wise:
| Examples of valid ID documents | Examples of valid proof of address documents |
|---|---|
|
|
What can you use Wise Account for?
The Wise account is designed to make managing money across currencies simple, especially if you spend, get paid, or frequently travel abroad.
Here are just some of the easy ways you can use your Wise account:
- Hold and manage money in 40+ currencies: Keep your money in different currencies and switch between them whenever you need to.
- Get paid like a local: Share your account details to receive payments in 8+ currencies — including USD, EUR, GBP, and more.
- Send money abroad: Transfer money to friends, family, employees or other businesses in 140+ countries, with low fees and the mid-market exchange rate.
- Spend worldwide with the Wise card: Use the Wise card to make purchases and withdraw cash in 150+ countries.
- Use it while traveling: Top up in advance, convert when the rate looks good, and spend in local currency with no surprise fees.
Wise account verification
As a financial service provider, Wise (formerly TransferWise) must verify customer accounts before they can be used. This is an important step in keeping customers and their money safe – and it can be done entirely online or in the Wise app.
Getting verified with Wise is pretty straightforward. For a smooth verification experience, make sure your ID document is valid, and use a clear photo which captures all the important details of the document.
You’ll also need to check the document you’re providing includes your full name, current address and date of birth. Once everything is uploaded, the Wise team can verify your account pretty quickly, or at least within a day or two.
More information here: Is Wise account safe?
How to know if your Wise account is verified
Once your Wise account has been verified you’ll get an email notification. If you’re sending a Wise transfer you’ll also be notified that your payment is on its way.
And don’t worry if you’re looking to receive a payment with Wise – you can receive money with Wise without verification. Just make sure the person sending you money has all your bank details, and your transfer will be deposited right into your normal bank account.
Why is Wise asking for ID?
As a financial service provider, Wise must verify customers to comply with the law and keep accounts safe. Banks have to do the same when you setup an account – asking for some ID is all part of the verification process used to ensure customers and their money are secure, and accounts can’t be used fraudulently.
Why does Wise ask for SSN?
Due to US financial regulation, Wise must ask for your social security number when you make a transfer from USD, or when you’re registering an account. This is part of a secure verification process, used to keep customers’ accounts safe. Wise will not run any credit checks or share your SSN with any third parties.
Is it safe to give Wise my social security number (SSN)?
Yes. Wise handles all customer data – including sensitive information like social security numbers – securely and in line with data privacy laws. You can read the full Wise privacy policy online if you’d like to know more about how data is managed.
How long does it take for Wise to verify your identity?
Wise can often verify your identity very quickly. Your documents are checked, and if there are any problems or any further information is needed, a member of the Wise team will get back to you to confirm your next steps. Common issues include unclear ID photos for example, which can’t be accepted as key information isn’t visible.
The verification process usually takes just a day or two, so you’re advised to reach out to the Wise team if you don’t hear anything within about 5 days.
How many days does it take to open and start to use a Wise account?
Opening a Wise account is quick and can be done fully online. To get started, you’ll need to go through a short verification process, which usually involves uploading a valid photo ID, proof of address, and sometimes a selfie holding your ID.
Verification typically takes around 1 working day. Once your account is verified, you can immediately create currency balances, access local account details to receive money, and order your Wise card for spending internationally.
Is it possible to link my US bank account to Wise?
US customers can link their bank account to Wise to make payments quickly and easily via ACH.
To link your account, log into the Wise.com website or Wise app, go to your profile, and select Payment methods > Connected bank accounts > Connect your bank account.
You’ll be guided through a secure connection process via Plaid, which lets you link your bank safely and start using it to fund transfers right away.
How to setup Wise account
Once you’ve registered your Wise account online or in the Wise app, and completed any required verification step you’re ready to start using it.
You’ll be able to add money to Wise from your bank or with a card, order a Wise Multi-Currency Card for spending and withdrawals, send money to others, and view all your activity and balance in a glance on your phone.
In this section, we’ll cover how to open a currency balance, how to setup your Wise account to receive money, and getting your Wise account details.
How to open a currency balance in your Wise Account
With a Wise multi currency account, you can open balances easily from the Wise mobile app or desktop site.
Here’s how to open a currency balance in your Wise account:
- Log into your account on the Wise app or desktop site
- Click on the + Open button, and then select ‘Balance‘
- From the list of currencies, select the currency you want to open a balance in.
- Your balance will be opened instantly, and you can start using it.
You can top up your account in various currencies, and there are different payment methods available with varying fees to top-up. When you tap the option to add a balance you’ll be shown your options in terms of the currencies you can top up, and the costs for different payment methods.
Any money you add will be available for you to spend after, using your Wise Multi-Currency Card if you have one, or you can use the balance to send a payment to someone in a currency of your choice.
How to set up a Wise account to receive money
When you open a Wise account you’ll be able to access local account details for in 8+ currencies. You can then use these account details to receive money to your Wise account from 30+ countries using a local transfer.
Just get your local account information from the Wise app, and share them with the person sending you money – easy for you and easy for the sender, too.
There’s also a handy Wise request payments feature which lets you generate a payment link you can send to someone, to make getting paid even faster. In the next section, we’ll cover how to get your Wise Account details.
How to get your Wise Account details
Once you’ve opened a currency balance in any of the 8+ supported currencies, you can get your own local account details to allow others to send money to you using a local transfer.
Here’s how to find your Wise account details:
- Log into your account on the Wise app or desktop site
- Tap the currency balance you need details for
- Click Receive and View and share account details
- You’ll be able to generate a shareable link which gives your account details
Once your account is up and running you can use the 10 local account details to receive money from over 30 countries.
It’s free to receive incoming payments in some supported foreign currencies, and to get paid by ACH in US dollars. However, there are a couple of important fees to be aware of – if you’re receiving a USD wire or USD by SWIFT, there’s a 6.11 USD fee to pay for incoming transfers.
Learn more here: How to receive money into Wise account
Wise account details
| Currency | Wise local account details |
|---|---|
| 🇺🇸 Wise USD Account |
|
| 🇪🇺 Wise Euro Account |
|
| 🇬🇧 Wise GBP Account |
|
| 🇨🇦 Wise CAD Account |
|
| 🇦🇺 Wise AUD Account |
|
| 🇳🇿 Wise NZD Account |
|
| 🇸🇬 Wise SGD Account |
|
| 🇷🇴 Wise RON Account |
|
| 🇭🇺 Wise HUF Account |
|
| 🇹🇷 Wise TRY Account |
|
Can I receive money on Wise without verification?
You can receive money with Wise to your bank account without completing any Wise verification step. Simply give the person sending you money your bank account details, and they can use Wise to arrange the payment directly to your account. There’s no need for you to sign up to a Wise account or complete any verification.
Learn more here: How to receive money into Wise account
Can I get USD account details with Wise?
Once you open a USD balance in your Wise account and complete verification, you can get your own USD account details to receive payments in US dollars.
With these details, you can receive ACH and wire transfers domestically from within the US, or international USD payments via SWIFT.
Your USD account details will include:
- Account holder name
- ACH and wire routing number
- Account number
- SWIFT code (for international payments)
You can find and share your USD account details from the Wise app or desktop site after opening a USD balance.
Do I need a bank account for Wise?
You do not need a bank account to receive a payment with Wise. You can simply open a digital Wise account and use your Wise local account details to get paid in 10 currencies.
That said, it is also possible to receive money into your bank account with Wise, if you are the recipient of the transfer. You can simply give your bank account details to the sender, and they can use Wise to transfer money to your account. In this case, the funds will be directly transferred to your bank account.
What is the minimum deposit for a Wise account?
There’s no minimum deposit requirement for a Wise account. To access some features for the first time you may be asked to top up your account, but the funds are yours to send, spend or withdraw however you’d like to once the feature has been activated.
How much money can I hold in my Wise account?
Wise does not apply holding limits for US customers, including those with routing numbers starting with 026. It’s free to hold money in your Wise multi currency account, and in most cases there’s no limit to the amount you can hold.
However, if you’re receiving money into your USD balance using your Wise account details, there may be receiving limits, such as a 35 million USD annual limit for personal accounts, and 150 million USD for business accounts.
These apply on a rolling 365-day basis and are specific to incoming payments, not the amount you can hold overall.
Does Wise charge a monthly fee?
There’s no monthly or annual fee to pay for Wise multi currency account or Wise Multi-Currency Card.
You may be asked to pay a one time fee for some Wise features – like ordering a Wise Multi-Currency Card – but after that you’ll only pay Wise’s low transaction fees when you use your account.
Can I use Wise as a normal bank account?
Wise isn’t a bank, and the Wise account won’t necessarily come with all the same features you’d get from a bank. Wise accounts can be used for everyday transactions in the US and abroad, but it’s important to read through the account’s terms and conditions so you understand the differences between Wise and a standard bank, to help you choose how to use your Wise account.
Learn more here: Can I use Wise as a bank account?
Can you open a Wise account without a US address?
You’ll be asked to prove your residential address when you open a Wise account. That means that to open a Wise account in the US you’ll need a US address.
However, to open a Wise account you don’t need to be a US citizen, passport or Green Card holder. Wise multi currency accounts can also be opened from a broad range of other countries, so if you’re a foreign resident you may still be able to open your Wise account with your local proof of address from wherever is home for you.
Can I use the Wise Account as a bank account in the US?
Wise is not a bank, but a licensed financial technology company. However, it does offer many of the features you’d typically expect from a bank account. With a Wise Account, you can hold and manage multiple currencies, receive payments, send money abroad, and spend using a Wise card. It’s a flexible option, especially for people who deal with international transactions, travel often, or get paid from overseas.
While you won’t get credit features like loans or overdrafts, Wise can still be used as your main everyday account, or alongside your regular bank account to handle foreign currencies with lower fees.
For more information – Can I use Wise as a bank account?
Wise Account limits
| Wise Account limits | |
|---|---|
| Holding limits | No holding limits for US customers in most cases |
| Sending limits (USD) | Up to 1,600,000 USD per international Swift transfer |
| Receiving limits (into USD balance) | Up to $20M per transaction/day and $35M per year (routing number starting with 026) |
*Information correct as of 22nd March 2025.
How to open a Wise business account
Wise business accounts have all the perks of a Wise personal account with some extra business friendly features, too.
You can hold 40+ currencies, get paid by customers around the world with local account details for 8+ currencies, and send payments to 140+ countries.
Whenever you need to convert from one currency to another you’ll get the mid-market exchange rate, with low, transparent fees.
Here’s how to open a Wise business account step by step:
- Open the Wise desktop site or app and click on Create account
- Enter your email address and confirm you’re opening a business account
- Add details about yourself and your business
- Upload any required verification documents
- Start a transfer and pay the one time fee for full Wise business account access
- Once your verification is complete, you’ll be notified and can use your account freely
Requirements to open a business account
Wise business accounts are available to US based sole traders, entrepreneurs and business owners. The exact documents and information you’ll need to register a Wise account can vary based on the business type. However, in general you’ll need:
- Business name and US address
- Employer/taxpayer ID number (EIN)
- Information about the company directors or shareholders with a 25% or higher stake
- Details about what your business does
The account holders, and any team members you want to add to the account, will also need to be verified, usually by adding images of some ID and address documents. The whole process can be done online or in the Wise app, and the Wise team can always help if you’re not sure what documents or details are required in your situation.
How to set up Wise business account to receive payments
Wise US business customers can get their own local account details for 10 currencies, to make it easy for customers to pay from 30+ countries. Simply give the bank details to anyone sending you money, add to your invoices or generate a Wise payment request, to have funds deposited directly to Wise. You can also add your local account details to marketplace sites and PSPs to get paid in a selection of currencies easily.
Here’s how to open a currency balance in your Wise business account, and receive payments:
- Log into your account on the Wise app or desktop site
- Select the currency you want to open a balance in
- Click on Get account details, and top up your account if you’re opening a balance for the first time
- You may need to complete a verification step – this can be done right from your phone
Once you have a currency balance set up you can give your local account details to anyone sending you a payment. To get your local account details with Wise here’s what you’ll do:
- Tap the currency balance for the currency you want to be paid in
- Click Receive and View and share account details
- You’ll be able to generate a shareable link which gives your account details
What is a Wise Account?
Wise is a fintech company which exists to make it easier for individuals and businesses to hold, send, spend and receive foreign currencies.
You can open a Wise multi currency account online or on the Wise app, hold 40+ currencies, and order a linked international debit card for spending in 150+ countries. Read our Wise multi currency account review to learn more.
Wise stands out because of its feature packed accounts which offer flexible and low cost ways to manage your money across currencies. All Wise currency exchange uses the mid-market exchange rate, and fees which start from 0.57%.
That can mean you save compared to using a bank – with no foreign transaction fees, minimum balances or maintenance costs to worry about.
What are the advantages of a Wise account?
Not sure if Wise is for you? Here are some of the features and benefits available with Wise, for you to consider:
- Open a Wise account online or in app, to hold 40+ currencies
- Get a Wise Multi-Currency Card for spending and withdrawals in 150+ countries
- Send payments to 140+ countries and get paid like a local from 30+ countries
- Convert currencies with the mid-market exchange rate and low fees from 0.57%
- Accounts available for personal and business customers around the world
Conclusion: How to setup a Wise account
Wise accounts are flexible and low cost, with great international features, which makes them a good choice for anyone who loves to travel or shop overseas, business owners paying and getting paid in foreign currencies and more.
It’s easy to open a Wise account online or in-app, to hold 40+ currencies and spend around the world with your linked Wise Multi-Currency Card.
Wise converts currencies with the mid-market exchange rate, with low, transparent fees for the services you need – which can mean that you get a better deal overall.
How to open Wise account FAQs
Can I open a Wise account online?
Yes, you can. Head to the Wise desktop site and click Create an account to register your Wise US account. You’ll just need to add a few personal and contact details, and to complete a verification step – which can all be done right from your phone or laptop.
How much does it cost to open a Wise account?
It’s free to open a personal Wise multi currency account, with a low one time fee to open a Wise business account. There’s no maintenance charge to worry about, so you’ll only pay Wise transaction fees for the services you actually need.
Can I open a Wise account in the US if I’m not resident?
You’ll need to provide a proof of address document to verify your Wise account. That means that to open a Wise US account you’ll have to have a US address. However, Wise is also available in almost all other countries around the world, so if you’re not a US resident you’ll likely still be able to register a Wise account in your home country.
Does Wise work in the US?
Yes. Wise works in the US, and in most countries around the world. Open a Wise US account online or in the Wise app in just a few steps.
Does Wise charge a fee to open an account?
There’s no fee to open a Wise personal account, and no minimum balance or maintenance charge to pay either.